Is there a way to get the [Decal] (or [Space Platform Ground Decals]) doodads to show up on top of roads? I was looking to make some turning lanes through part of a city I've been working on - but they seem to be hidden under the roads even when their height is raised. I've included two screenshots, the first from the editor, the second is in-game.
It looks a bit cluttered, I'd say mainly in the 1st and 3rd pictures, but just a bit. As Victiln said you want to make sure that the player has enough space to operate.
I'd keep the offices though if I were in your shoes. Even if they're "wasted space" they add something that the player can relate to and make it a bit more realistic (all things considered of course). Also, the player shouldn't have to do something in every single room they walk into, just as you space out your doodads, space out the "special" rooms that require player interaction.
Not sure if this will work, but I think that you could run a trigger to catch this. If you don't create any additional units, just use the Map Initialization event, otherwise you can call it on the Unit Created event.
Anyways, without having the editor in front of me, I seem to remember that you can alter the models for the actors with triggers (?). I know you can change them for doodads, and I think you can for units too. Run an event that picks all the units in the entire map, with a condition of the models you don't like. Then have the action be to change the model to a RandInt() of the types you do like.
Not sure if you can do this, but I hope this helps.
While you are technically limited to the three levels of walkable cliffs, you can actually add in cliff levels - sortof.
First, you can add in ground pathing to the "Sunken" cliff level (Height - 0) and jerry-rig some ramps to get there, but this solution isn't optimal. Ordering units around is a pain, and it can cause a lot of other pathing and visual issues.
More workable solutions are the following (if you have an issue with the images, open the links in a new window or tab):
1) Use a combination of adding in cliffs and ramps and terraforming the ramps to match your terrain.
As you can see from the two pictures below, I (currently) have what looks like 4 different levels of cliffs.
Height - 0 In the bottom left below the marines there is the "sunken" cliff level.
Height - 1 Then you'll see the (very) plain ground.
Height - 2 Next there is a earthen wall with some Siege Tanks overlooking a road.
Height - 3 Look above the road intersection, there is a one story building above the intersection with a sign on top of it. There is also a building to the right of the intersection... where we find....
Height - 4 A fourth level of cliffs? This building (by the storefront / vents) has two stories!
Enabling the grid allows us to get a better understanding of how this is done.
See the blue areas? Those are actually ramps which have been molded to be completely flat. The terrain that is "level" with them has actually been raised. This means that the storefront / vent you see next to the two story building is actually on the Height - 0 level, the same as the marines in the bottom left! This can be done nearly as many times as you want, you just need to remember to leave space between each level to insert the ramp and flatten it. Then simply raise the terrain underneath it and you're set.
Now there are some issues with this solution. Namely, you will have some problems involving unit-sight when they are on and around the ramps. This can be fixed with some regions that change the height (sight-height, not xyz-height) of the units on the ramps if you really want. You'll also have to get use to the construction method, and it does take a fair amount of time to level the ramps the first few times you do it.
2) The second way to add a bunch of cliff levels, make your cliff levels out of the terrain itself. Here are some pictures from the same (unfinished) map seen above from a different location. To make the cliffs more realistic, add in doodads and modify the texturing to liven them up.
Hope this helps, and if this is something that you'd like to see a tutorial of just ask. I can toss one up in a day or two.
Thanks for the data editing thought - that's what I figured I would be doing but was hoping for an easier solution.
As far as using the Rock (Giant) doodad, it changes that one too :( You can see in the second picture that the Rock (Tower) doodads are changed (under No Fly Zone 003), the same effect is applied to the Rock (Giant) ones (there is actually one at the top of the second picture, just above the staircase and northeast of the cave.
I'm having a doodad/unit issue when changing my map's the tileset.
I wanted to change some of the cliffs and add a road to the Mar Sara tileset. This was done easily enough. However, when I load the new tileset the unit and doodads change.
Originally the tileset looks like this:
But once I've loaded up the new custom tileset - or even one that is a strait duplicate of the original Mar Sara tileset - the units and doodads change.
Any help on getting these back to the original coloring while using a custom tileset?
If the reason you want to make a "giant circle" brush for your terrain is so that you can make sure you develop a perfectly circular map, you could always make a circular region in the middle of the map. Just make the center of the region at the center point of your map and the size the bounds of your map.
I realize this thread is old, but in case anybody else is looking for a simple solution to this question - here it is.
To turn on the lights:
Actor - Send actor message "Signal LightPowerUp" to all actors contained by game region (Entire map)
To turn off the lights:
Actor - Send actor message "Signal LightPowerOff" to all actors contained by game region (Entire map)
You have to manually type in the LightPowerUp/Off parts once you've selected Signal (which is under Value). Works great in maps that change the lighting between day and night.
This really seems a lot cleaner (at least compared to Blizzard) way to do night / day stuff.
My only problem is that I cannot get the last function and trigger to work :( I copied both and pasted them here to see what was wrong with them (and Bolded what I thought was wrong). I cannot seem to get the function to actually return what I want. Then, because of this, I can't choose the function in the trigger (either the MapInit one or the following renew).
Within the function I have "Use Default Grammar Text" checked... but it doesn't seem to know it is returning the string.
Time Of Day To String
Options: Function
Return Type: String
Parameters
ToD = 00:00:00 <Time Of Day>
Grammar Text: Time Of Day To String(ToD)
Hint Text: Converts a time of day value to a String.
Custom Script Code
Local Variables
Actions
General - Return Value
Dialog - Create a Modal dialog of size (500, 400) at (0, 0) relative to Top of screen
Dialog - Show (Last created dialog) for (All players)
Dialog - Create a label for dialog (Last created dialog) with the dimensions (200, 50) anchored to Center with an offset of (50, 50) with the text (Text((Entered chat string))) color set to White text writeout set to
false with a writeout duration of 2.0
Variable - Set Clock Display = (Last created dialog item)
Dialog - Show (Last created dialog item) for (All players)
Is there a way you could either show me what I've done wrong, or upload a map?
0
Is there a way to get the [Decal] (or [Space Platform Ground Decals]) doodads to show up on top of roads? I was looking to make some turning lanes through part of a city I've been working on - but they seem to be hidden under the roads even when their height is raised. I've included two screenshots, the first from the editor, the second is in-game.
Editor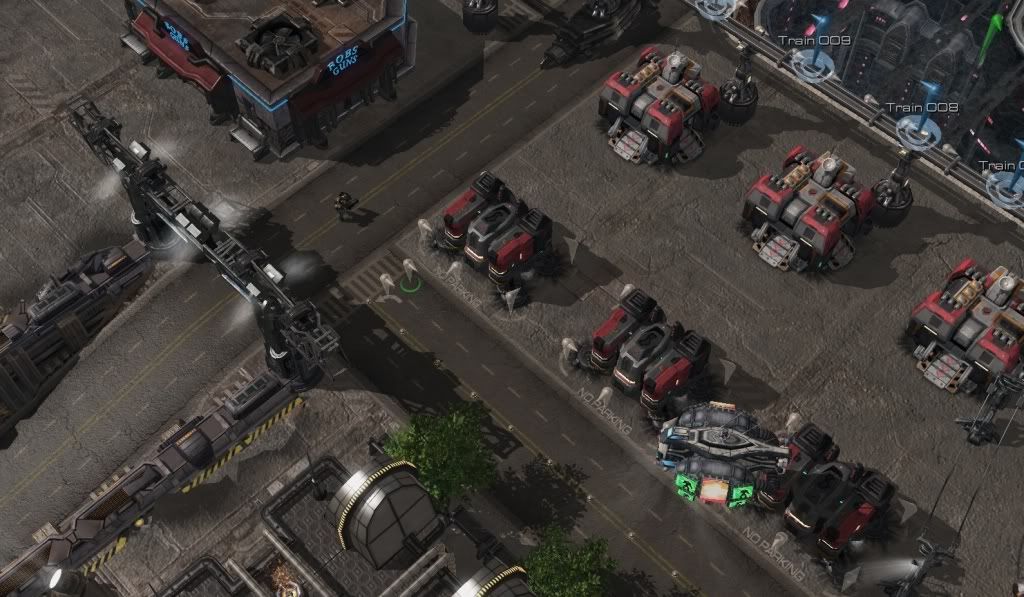
In-Game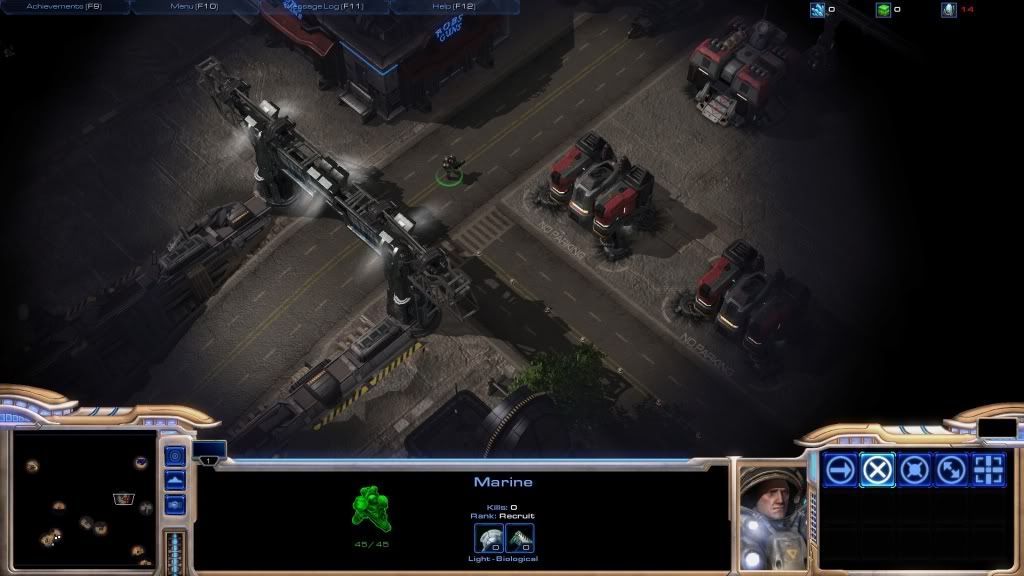
0
I love the coloring of Symbiosis, did you do that via Omni lights or actually texture the terrain?
Flowing Heat would probably be my second choice, but the lighting seems off - too white/foggy maybe?
Temple of Adun actually doesn't excite me all that much... but it could be because it is 4:30 in the morning here.
0
It looks a bit cluttered, I'd say mainly in the 1st and 3rd pictures, but just a bit. As Victiln said you want to make sure that the player has enough space to operate.
I'd keep the offices though if I were in your shoes. Even if they're "wasted space" they add something that the player can relate to and make it a bit more realistic (all things considered of course). Also, the player shouldn't have to do something in every single room they walk into, just as you space out your doodads, space out the "special" rooms that require player interaction.
0
@MeheliuM: Go
Not sure if this will work, but I think that you could run a trigger to catch this. If you don't create any additional units, just use the Map Initialization event, otherwise you can call it on the Unit Created event. Anyways, without having the editor in front of me, I seem to remember that you can alter the models for the actors with triggers (?). I know you can change them for doodads, and I think you can for units too. Run an event that picks all the units in the entire map, with a condition of the models you don't like. Then have the action be to change the model to a RandInt() of the types you do like.
Not sure if you can do this, but I hope this helps.
0
@Genopath: Go
While you are technically limited to the three levels of walkable cliffs, you can actually add in cliff levels - sortof.
First, you can add in ground pathing to the "Sunken" cliff level (Height - 0) and jerry-rig some ramps to get there, but this solution isn't optimal. Ordering units around is a pain, and it can cause a lot of other pathing and visual issues.
More workable solutions are the following (if you have an issue with the images, open the links in a new window or tab):
1) Use a combination of adding in cliffs and ramps and terraforming the ramps to match your terrain.
As you can see from the two pictures below, I (currently) have what looks like 4 different levels of cliffs.
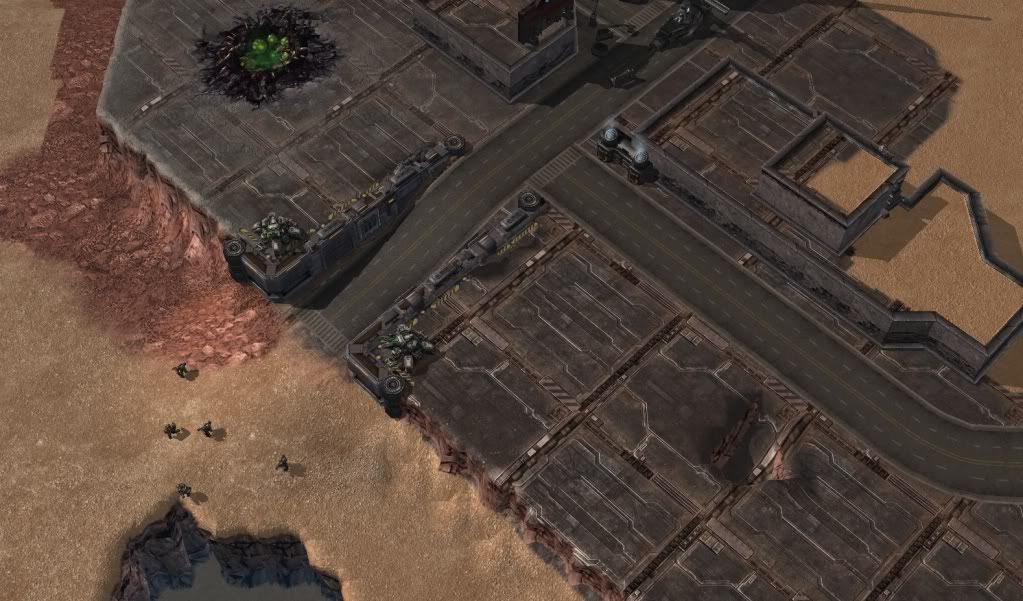
Height - 0 In the bottom left below the marines there is the "sunken" cliff level.
Height - 1 Then you'll see the (very) plain ground.
Height - 2 Next there is a earthen wall with some Siege Tanks overlooking a road.
Height - 3 Look above the road intersection, there is a one story building above the intersection with a sign on top of it. There is also a building to the right of the intersection... where we find....
Height - 4 A fourth level of cliffs? This building (by the storefront / vents) has two stories!
Enabling the grid allows us to get a better understanding of how this is done.
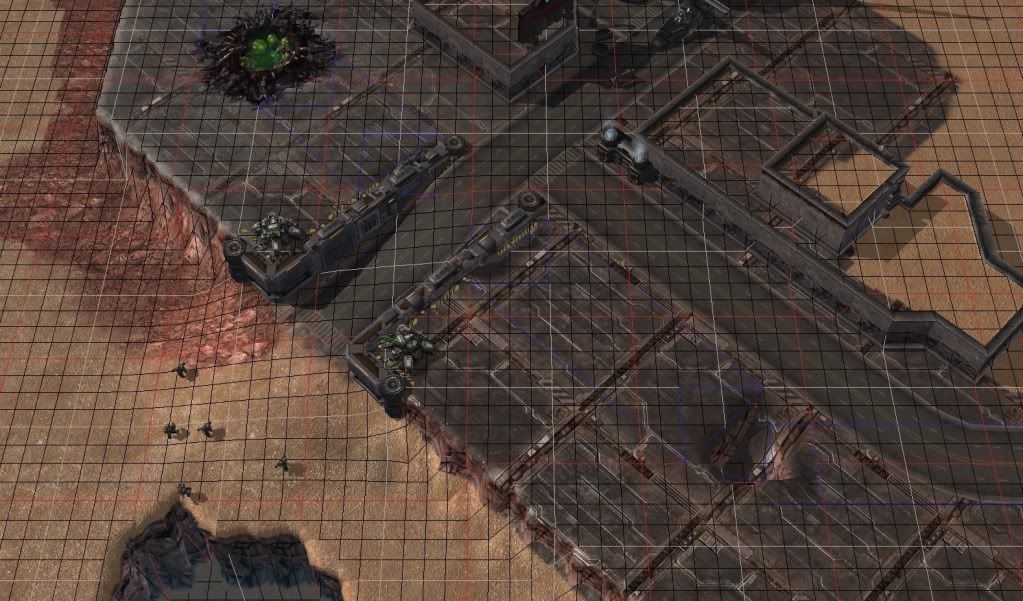
See the blue areas? Those are actually ramps which have been molded to be completely flat. The terrain that is "level" with them has actually been raised. This means that the storefront / vent you see next to the two story building is actually on the Height - 0 level, the same as the marines in the bottom left! This can be done nearly as many times as you want, you just need to remember to leave space between each level to insert the ramp and flatten it. Then simply raise the terrain underneath it and you're set.
Now there are some issues with this solution. Namely, you will have some problems involving unit-sight when they are on and around the ramps. This can be fixed with some regions that change the height (sight-height, not xyz-height) of the units on the ramps if you really want. You'll also have to get use to the construction method, and it does take a fair amount of time to level the ramps the first few times you do it.
2) The second way to add a bunch of cliff levels, make your cliff levels out of the terrain itself. Here are some pictures from the same (unfinished) map seen above from a different location. To make the cliffs more realistic, add in doodads and modify the texturing to liven them up.
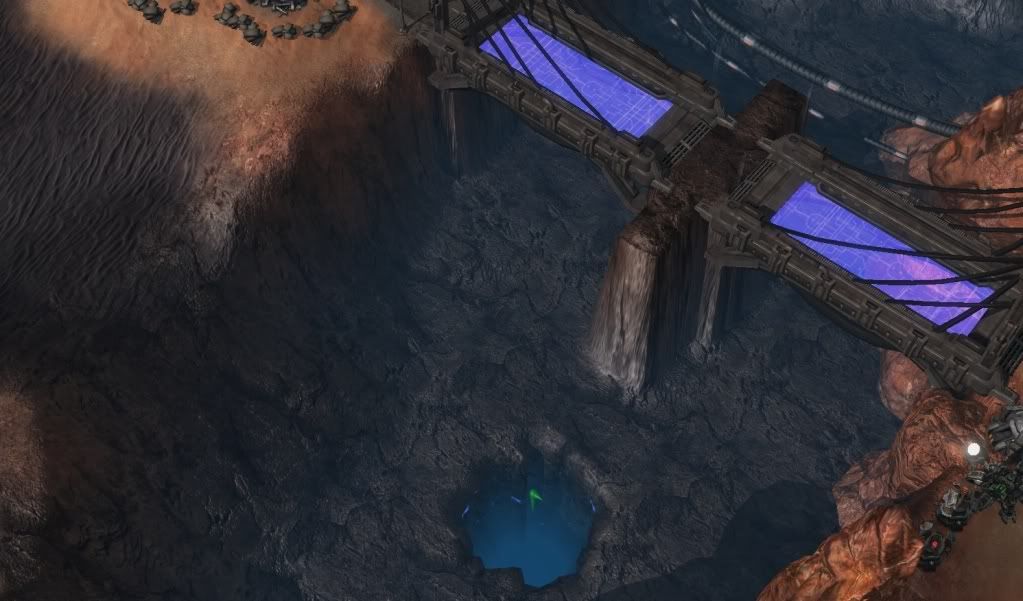
Hope this helps, and if this is something that you'd like to see a tutorial of just ask. I can toss one up in a day or two.
0
@Tolkfan: Go
This feels like cheating... but it feels so right. Thank you so much!
0
@Mozared: Go
Thanks for the data editing thought - that's what I figured I would be doing but was hoping for an easier solution.
As far as using the Rock (Giant) doodad, it changes that one too :( You can see in the second picture that the Rock (Tower) doodads are changed (under No Fly Zone 003), the same effect is applied to the Rock (Giant) ones (there is actually one at the top of the second picture, just above the staircase and northeast of the cave.
0
I'm having a doodad/unit issue when changing my map's the tileset.
I wanted to change some of the cliffs and add a road to the Mar Sara tileset. This was done easily enough. However, when I load the new tileset the unit and doodads change.
Originally the tileset looks like this: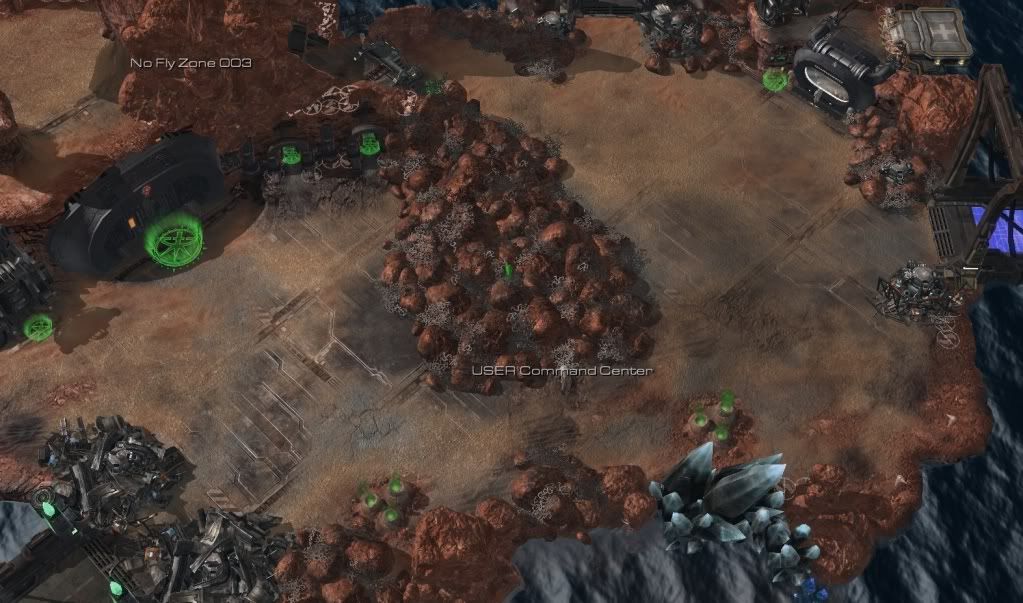
But once I've loaded up the new custom tileset - or even one that is a strait duplicate of the original Mar Sara tileset - the units and doodads change.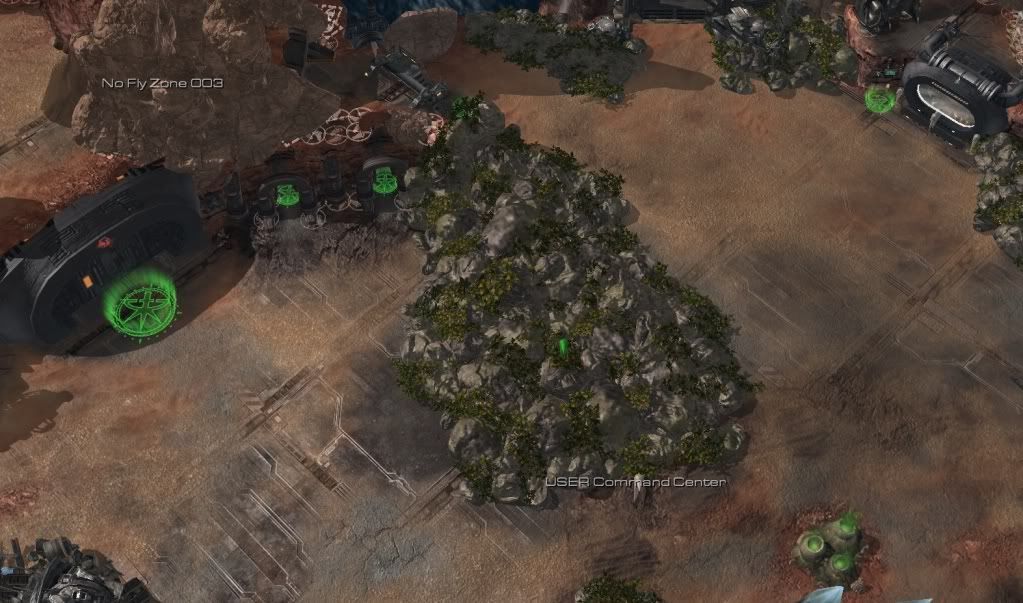
Any help on getting these back to the original coloring while using a custom tileset?
0
@HatsuneMikuMegurine: Go
Try using the Ulaan Destructible Bridge model? Looks decent if you use a custom color with a HDR multiplier around 2.
0
@Feldeat: Go
If the reason you want to make a "giant circle" brush for your terrain is so that you can make sure you develop a perfectly circular map, you could always make a circular region in the middle of the map. Just make the center of the region at the center point of your map and the size the bounds of your map.
0
@chriscisco: Go
View -> Show Layer -> Pathing (Shift - H)
0
@Underp4ntz: Go
LOVE the new glow effect. Amazing work.
0
@LazyCoder: Go
I realize this thread is old, but in case anybody else is looking for a simple solution to this question - here it is.
To turn on the lights:
Actor - Send actor message "Signal LightPowerUp" to all actors contained by game region (Entire map)
To turn off the lights:
Actor - Send actor message "Signal LightPowerOff" to all actors contained by game region (Entire map)
You have to manually type in the LightPowerUp/Off parts once you've selected Signal (which is under Value). Works great in maps that change the lighting between day and night.
0
This really seems a lot cleaner (at least compared to Blizzard) way to do night / day stuff.
My only problem is that I cannot get the last function and trigger to work :( I copied both and pasted them here to see what was wrong with them (and Bolded what I thought was wrong). I cannot seem to get the function to actually return what I want. Then, because of this, I can't choose the function in the trigger (either the MapInit one or the following renew).
Within the function I have "Use Default Grammar Text" checked... but it doesn't seem to know it is returning the string.
Time Of Day To String
Options: Function
Return Type: String
Parameters
ToD = 00:00:00 <Time Of Day>
Grammar Text: Time Of Day To String(ToD)
Hint Text: Converts a time of day value to a String.
Custom Script Code
Local Variables
Actions
General - Return Value
Dialog - Create a Modal dialog of size (500, 400) at (0, 0) relative to Top of screen
Dialog - Show (Last created dialog) for (All players)
Dialog - Create a label for dialog (Last created dialog) with the dimensions (200, 50) anchored to Center with an offset of (50, 50) with the text (Text((Entered chat string))) color set to White text writeout set to
false with a writeout duration of 2.0
Variable - Set Clock Display = (Last created dialog item)
Dialog - Show (Last created dialog item) for (All players)
Is there a way you could either show me what I've done wrong, or upload a map?